Choosing a Clearinghouse: Office Ally or Availity?

A clearinghouse is like a middleman that checks and sends paperwork between providers and insurance payers. It makes sure everything is filled out right so you can get paid. Think of it like a spell-checker and mailroom for medical bills. The clearinghouse also enables you to send out your claims directly from Aloha to the payer and receive your ERAs (Electronic Remittance Advice or itemized payment receipt) directly into Aloha. Using a clearinghouse will save a lot of time on billing and reconciling payments.
When a claim is sent out through Aloha, it's first stop is the clearinghouse. The clearinghouse will either accept (you're all good!) or reject (you made an error) the claim. A rejection is typically a demographic error like the patient's birthday is incorrect or your billing addresses is wrong. Once the claim leaves the clearinghouse, it goes to the payer. While the payer can also reject a claim; typically once it reaches the payer is it either paid or denied.
Aloha integrates with two clearinghouses: Office Ally™ and Availity.
Unfortunately, there is a charge from the clearinghouse to bill out claims; it is important to understand how their pricing works as well as how to find your payers in each system in order to minimize charges and send your claims to the right place. To break it down, Availity charges by the claim, Office Ally by the NPI number. We recommend Availity when you are billing several different NPIs (i.e., the RBTs have their own NPI numbers) like with Tricare West or Medicaids. Either way, the ERAs come back through Office Ally so you will need an account with them and all ERAs will be completed with them. There is no charge to receive ERAs through Office Ally and back to Aloha.
Check your Payers
Checking Payers in Office Ally
To search for your payer, go to Office Ally Payer List
In the "Search Payers" box, you can type in a payer name or search by payer ID. 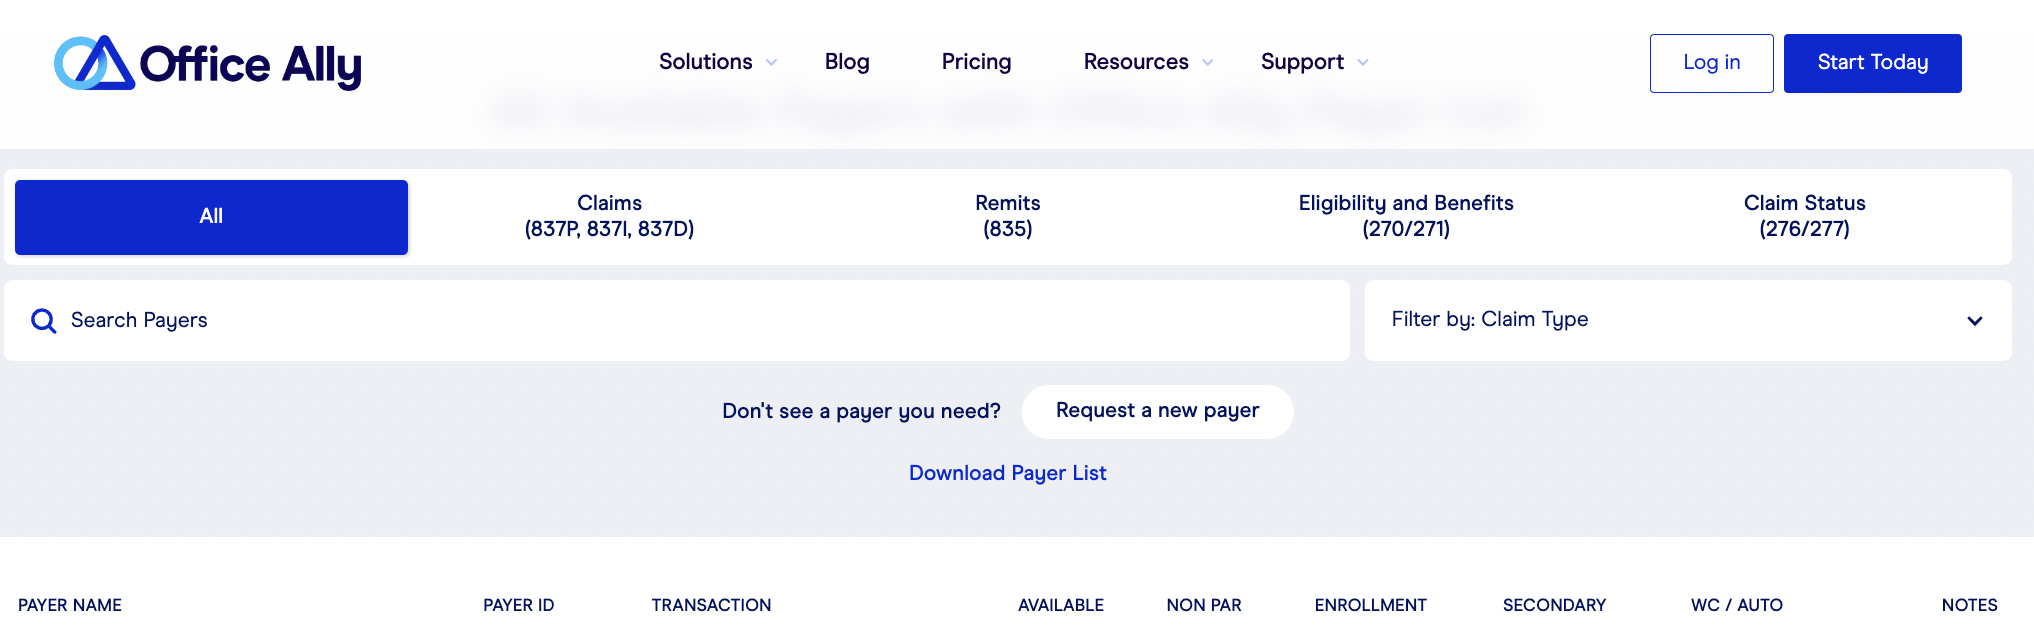
The Payer list in Office Ally will show you the payer name, their ID, the type of transactions you can process with them, and a few other important details. Below is a breakdown of the category definitions:
- Payer name: The name of the payer as identified in Office Ally. This name does not need to be identical (e.g., BCBS vs. Blue Cross) to what is entered in Aloha necessarily; what matters most is that the payer ID is the right one for the payer you are looking to bill.
- Payer ID: a unique 4-6 letter or numerical value that identifies this payer within Office Ally. Verifying your Payer ID will ensure that your claims are being sent to the correct place.
- Transaction: Look for the one next to your payer name labeled "Professional Claims - 837P". or "Remits - 835". These are the file types that are processed for sending CMS1500 claims out from Aloha and receiving EOBs/ERAs back into Aloha.
- Available: when the checkmark is checked for payer and available, this means this payer can be billed and processed through Office Ally.
- Non par: when this checkmark is checked, this means the payer is a non-participating payer and would require you to pay an additional fee in order to bill them through Office Ally. For a breakdown of Office Ally's pricing, visit this link: Office Ally Pricing

In general, OA charges per tax ID + Rendering Provider NPI combination for non-participating providers. For non-par payers, there is no additional cost.
- Enrollment: This is only relevant for 835 transactions, meaning EDI enrollment for the selected payer. When this box displays an !, it means this payer requires enrollment EDI Enrollment. These forms are listed by State in Office Ally under Resources > Payer Claims/Eligibility/Claim Status Enrollment Instructions
- Secondary: This checkmark indicates that the payer allows electronic secondary billing submission through Office Ally. If it is not checked, it means that you'd have to bill this payer for secondary manually through paper submission or through the payer portal.
- Notes: This can be useful to check if there is anything additional you should know about the payer. This typically tells you if a payer needs you to fill out an ERA form, their customer service number, and sometimes if the payer goes by another name when you're searching for their EDI/ERA form.
Checking Payers in Availity
To search for your payer in Availity, go to this link here: Availity Payer List
You can search a payer by their name or by their Payer ID if you have it. Once you search and find your payer, you will see a few different categories next to the transaction type. The transaction type you are looking for within Availity is 837P (Professional Encounters).
- Batch: Next to the 837P transaction type, you may see "Get EDI Plan" or "Available" here.
- Get EDI Plan means that you need to upgrade your Availity account to be able to bill this payer electronically through the clearinghouse. Clicking this link will prompt you to upgrade your account if you have not done so already.
- Available means that no further action is needed in order to bill this payer through the clearinghouse.
Pricing: Contact Availity directly for pricing info for EDI plans.
Complete the Integration

Complete the Office Ally integration if you are using either Office Ally or Availity for claims. Your ERAs will come back through Office Ally either way!
Office Ally Integration
Availity Integration Instructions
Complete Required Enrollments
EDI Enrollments
EDI stands for Electronic Data Interchange. Basically it gives the clearinghouse permission to process claims electronically. Not all payers require it, but if they do, you cannot bill out until enrollment is complete.Office Ally EDI Enrollment
If you are using Office Ally as a primary clearinghouse and not just for ERA enrollment, double check to make sure you don't need to complete any EDI enrollments. Required enrollments are listed by State under Resources > Payer Claims/Eligibility/Claim Status Enrollment Instructions
Availity EDI Enrollments
In the Availity Payer List, next to the 837P transaction type, you may see "Get EDI Plan" or "Available".
- Get EDI Plan means that you need to upgrade your Availity account to be able to bill this payer electronically through the clearinghouse. Clicking this link will prompt you to upgrade your account if you have not done so already.
- Available means that no further action is needed in order to bill this payer through the clearinghouse.
ERA Enrollments
All ERA enrollments must be completed through Office Ally, even if you are using Availity as your clearinghouse. ERAs can be found in Office Ally under Resources > Payer ERA Enrollment Forms and should be listed alphabetically. You should complete an ERA enrollment for every insurance payer you work with. Enrollment is not required, but highly suggested as it will save time on reconciling payments.
Availity ERA Delivery Change Form: Please complete the ERA Delivery Change Form attached to this article if you are using Availity for billing.
Related Articles
Availity EDI Clearinghouse Integration
ERAs from Availity are not being posted back to Aloha automatically to the Payment Center at this time. If you'd like your ERAs to be auto posted, please see the following steps at the bottom of this article. They will need to be routed from Availity ...Office Ally Integration
Please follow the steps below to complete your Office Ally enrollment as well as EDI and ERA enrollment. Initial Account Set-up Step 1: Go to https://cms.officeally.com/AlohaABA and click Submit your claims today Step 2: Confirm you are signing up ...Secondary Billing in AlohaABA
Secondary Billing is exclusively supported by Office Ally as the selected clearinghouse at this time. Secondary Billing cannot be completed with an Availity integration. As this feature is newly released, we recommend submitting one secondary claim ...Billing Overview
Getting Ready to Bill It is vital to have the correct information in the system to submit for billing. Make sure you have the correct Payer ID (double check the clearinghouse) and have completed eligibility checks for your clients to ensure that you ...Correcting Claims in Availity
After you’ve processed claims through Aloha to get sent to Availity, you may encounter a situation where you need to fix or correct a claim. Before we get started, let’s define these words: Rejection: When a claim is rejected, the claim must be fixed ...